Electric Water Heater Maintenance
MAINTENANCE FOR YOUR ELECTRIC WATER HEATER
MAINTENANCE TIPS TO KEEP YOUR UNIT RUNNING EFFICIENTLY
Performing routine maintenance checks on your Proline electric water heater is critical in order to ensure your unit is running in optimal condition. If you keep up on your maintenance checks, you will help your water heater last closer to it’s expiration date (which is typically around 10 years) and also run efficiently during its time running in your home.
AO Smith Installation Instructions and Use & Care Guide
The following information is taken from the AO Smith Installation Instructions and Use & Care Guide for Residential Electric Water Heaters. Read this manual and the labels on the water heater before you install, operate, or service it. If you have difficulty following the directions, or aren’t sure you can safely and properly do any of this work yourself:
• Call your local plumbing supplies store to have this water heater installed. Professional Installation is available for this product and the work is guaranteed.
• Schedule an appointment with a qualified person to install your water heater. Call AO Smith’s Technical Assistance Hotline which is listed on the water heater’s warranty sheet. We can help you with installation, operations, troubleshooting, or maintenance. Before you call, write down the model and serial number from the water heater’s data plate.
Incorrect installation, operation, or service can damage the water heater, your house and other property, and present risks including fire, scalding, electric shock, and explosion, causing serious injury or death.
AHRI Certification® applies to residential electric water heaters with rated capacities of 20 to 120 gallon and input ratings of 12 kw or less.
Routine Maintenance
Routine maintenance will help your water heater last longer and work more efficiently. If you can’t perform these routine maintenance tasks yourself, contact a qualified person.
Water Heater Maintenance
After the first six months, drain and flush the water heater and inspect the anode rod. Depending on the hardness of your water, repeat this process at least annually, or more frequently if needed. From time to time you may need to replace a heating element or a thermostat. All three maintenance tasks are described below.
Draining and Flushing the Water Heater
Tap water contains minerals that can form lime deposits on heating elements or sediment in the bottom of the tank. The amount of lime deposits or sediment depends on the hardness of your tap water. The rate at which sediment builds up depends on water quality and hardness in your area, the temperature settings, and other variables. We recommend draining and flushing the water heater after the first six months of operation to determine the amount of sediment build up. Draining sediment extends the life of the tank, heating elements, and drain valves.
In areas with very hard water, remove and check the heating elements whenever you drain the tank. If you have heavy lime deposits on heating elements, you will need to replace them more often.
Sediment may form large masses that can prevent the tank from draining. Have a qualified person use a de-liming agent suitable for potable water to remove the sediment buildup.
In most cases, it is easier and cheaper to replace lime-encrusted elements than trying to remove heavy lime deposits.
To drain and flush the tank
1. Locate the water heater’s circuit breaker and turn it OFF (or remove the circuit’s fuses).

2. Open a hot water faucet and let the hot water run until it is cool. WARNING! Be sure the water runs cool before draining the tank to reduce the risk of scalding.

3. Connect a garden hose to the drain valve and place the other end of the hose in a drain, outside, or in buckets.
4. Turn the cold water supply valve OFF.
5. Open the drain valve on the water heater.

6. Open a hot water faucet to help the water in the tank drain faster. NOTICE: DO NOT turn electrical power back on unless the tank is completely full of water.
7. Remove and inspect the anode rod (see Repair Parts Illustration on back cover for location of the anode rod). Replace the anode rod if it is depleted. Turn power off. Run hot water until it’s cool. Turn cold water supply valve off. Open a hot water faucet to depressurize tank. Locate and remove the black plastic cover marked “Anode Rod”. Use a “key hole” saw or similar tool to remove the foam insulation covering the anode rod. Once the anode rod is exposed, use a 11/16” socket wrench with an extension to remove it. Inspect the anode rod and replace if depleted. Apply Thread sealant tape or pipe joint compound and reinstall the anode rod tightly. It is not necessary to replace the foam removed to access the anode. Turn cold water supply valve on. When hot water runs full, close hot water faucet. Check for leaks and repair if necessary. Turn power on.
If the sediment was present when the tank was drained, flush the tank by opening the cold water supply valve and letting the water run until no more sediment drains from the tank. Close the drain valve when you are done. NOTICE: Do not turn power back on until the tank is completely full of water. For complete instructions on filling the tank, follow Step 8 in the Installation section.
Refill the tank by opening the cold water supply valve. Make sure a hot water faucet is open and the drain valve is closed. Allow the hot water to run full for at least three minutes to make sure the tank has all the air removed and is completely full of water. Failure to perform this step can cause the upper heating element to burn out. Once you are certain the tank is completely full of water, close the hot water faucet.
Restore power to the water heater. It may take two hours for the tank to heat up

Anode Rod: The anode rod is a sacrificial metal rod that helps reduce corrosion and premature failure (leaks) in the tank. The anode rod is a consumable item. Inspect the anode rod after the first six months of operation when you drain and flush the tank. Replace the anode rod if it is substantially worn out or depleted. Thereafter, inspect the anode rod annually or more frequently if needed. If you use a water softener, your anode rod will deplete faster than normal. Inspect the anode rod more frequently, replacing the anode rod as needed. Obtain new anode rods from your local hardware stores or have a qualified person replace it. (Anode rods are a consumable item and are not covered under warranty).
8. If the sediment was present when the tank was drained, flush the tank by opening the cold water supply valve and letting the water run until no more sediment drains from the tank. Close the drain valve when you are done. NOTICE: Do not turn power back on until the tank is completely full of water. For complete instructions on filling the tank, follow Step 8 in the Installation section.
9. Refill the tank by opening the cold water supply valve. Make sure a hot water faucet is open and the drain valve is closed. Allow the hot water to run full for at least three minutes to make sure the tank has all the air removed and is completely full of water. Failure to perform this step can cause the upper heating element to burn out. Once you are certain the tank is completely full of water, close the hot water faucet.
10. Restore power to the water heater. It may take two hours for the tank to heat up.
Replacing the Heating Element WARNING! Working on an energized circuit can result in severe injury or death from electrical shock. Turn power off. Check wires with a noncontact circuit tester to make sure power is off. When you are finished, be sure all covers are secured to reduce the risk of fire and electric shock. If you are not comfortable replacing a heating element or thermostat yourself, have this work done by a qualified person.

Non-Contract Circuit Tester
To replace the heating element, you’ll need the following tools and supplies:
Non-Contact Circuit Tester
Heating Element (with gasket)
Element Wrench
Always turn power OFF and check the power wires with a non-contact circuit tester before working on the water heater.

Heating Element (with gasket)
Check your water heater’s data plate for the correct wattage and voltage. Heating elements are available at most hardware stores.

Element Wrench
Some regular sockets (1 1/2 inch) may work, but regular sockets are often beveled and may slip. Inexpensive element wrenches are available at local hardware stores.
Hand dishwashing soap to lubricate the gasket
A clean cloth to clean the threaded opening
A flat blade and a Phillips screwdriver
Steps for Replacing the Heating Element
1.Turn the power OFF at the circuit breaker or remove fuses.

2. Open the electrical junction box on top of the water heater. Using a non-contact circuit tester, check the power wires to make certain the power is OFF.

3. Open a hot water faucet and let the hot water run until it is cool. WARNING! Be sure the water runs cool before draining the tank to reduce the risk of scalding.

4. Connect a garden hose to the drain valve and place the other end of the hose in a drain or outside (or use buckets). Turn OFF the cold water valve that supplies the water heater. Open the drain valve on the water heater. Opening a hot water faucet will help the tank drain faster.
5. Remove the upper or lower access panel on the water heater, and then fold back the insulation and remove the plastic element/thermostat cover.

6. With the tank drained and power off, remove the power wires from the element you intend to replace.
7. Remove the bad element using an element wrench.
8. Make sure the new element is the correct replacement by referring to the water heater’s data plate for voltage and wattage information.
9. Clean the threads in the tank opening with a rag. Insert the new element equipped with a rubber gasket. NOTE: Use a drop of hand dishwashing liquid to lubricate the gasket to help avoid damaging the gasket as it is being tightened. Tighten with an element wrench.
NOTICE: Do not turn power back on until the tank is completely full of water. For complete instructions on filling the tank, follow Step 8 in the Installation section.
10. Refill the tank by opening the cold water supply valve. Make sure a hot water faucet is open and the drain valve is closed. Allow the hot water to run full for at least three minutes to make sure the tank has all the air removed and is completely full of water. Failure to perform this step can cause the upper heating element to burn out. Once you are certain the tank is completely full of water, close the hot water faucet.
11. Check the newly installed element for leaks. If a leak is present, tighten the element until the leak stops. If you cannot stop the leak, drain the tank and remove the element. Inspect the gasket for damage. If the gasket is damaged, replace the gasket and re-install the element.
12. Once the element is successfully installed and there are no leaks, replace the power wires, thermostat cover, insulation, and access panel. Make sure all wire connections are tight. Replace the cover on the electrical junction box.
13. Restore power to the water heater. It may take two hours for the tank to heat up.
Replacing the Thermostat
WARNING! Working on an energized circuit can result in severe injury or death from electrical shock. Turn power off. Check wires with a noncontact circuit tester to make sure power is off. When you are finished, be sure all covers are secured to reduce the risk of fire and electric shock.
To replace the thermostat, you’ll need the following tools and supplies:
A non-contact circuit tester. Always turn power OFF and check with a noncontact circuit tester before working on the water heater.

A replacement thermostat (available at hardware stores). Take the old thermostat to the store to ensure the replacement thermostat is correct.
A business card to check the gap between the thermostat and the tank
Tape and a permanent marker to mark the wires
A flat blade and a Phillips screwdriver
Steps for Replacing the Thermostat
1. Turn the power OFF at the circuit breaker or remove fuses. NOTICE: It is not necessary to drain the tank to replace a thermostat.
2. Open the electrical junction box on top of the water heater. Using a non-contact circuit tester, check the power wires to make certain the power is OFF.

3. Remove the upper or lower access panel on the water heater and carefully fold back the insulation and plastic element/thermostat cover.
4. Make sure the replacement thermostat matches the original thermostat.
5. Mark the wires with tape so you’ll know how to put them back on.
6. Disconnect the wires from the bad thermostat and remove the thermostat from the metal mounting clip.
7. Install the new thermostat in the metal mounting clip.
8. Make sure the new thermostat fits snuggly against the tank. You should NOT be able to slip a business card between the thermostat and the tank. If you can, bend the thermostat mounting clip until the thermostat fits tightly against the tank.
9. Attach the wires following the wiring diagram on the water heater’s label. Make sure all wire connections are tight.
10. Replace the plastic element/thermostat cover, insulation, and access panel.
11. Replace the cover on the electrical junction box.
12. Restore power to the water heater. It may take two hours for the tank to heat up.
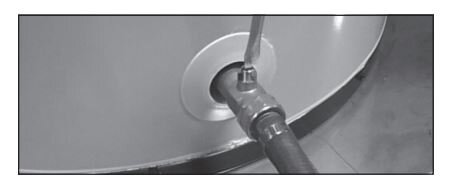
T&P Relief Valve Maintenance
Read and follow the operating and annual maintenance instructions provided by the manufacturer of the T&P Relief Valve (yellow label attached to T&P Relief Valve). If no label is attached to the T&P Relief Valve, follow the instructions in this section. Minerals in the water can form deposits that cause the valve to stick or create blocked passages, making the T&P Relief Valve inoperative. Follow these guidelines:
At least annually, operate the T&P Relief Valve manually to ensure the waterways are clear and the valve mechanism moves freely (above). Before operating the valve manually, check that it will discharge in a place for secure disposal. If water does not flow freely from the end of the discharge pipe, turn OFF the power to the water heater. Call a qualified person to determine the cause.

WARNING! Hot water will be released. Before operating the T&P relief valve manually, check that it will discharge in a safe place. If water does not flow freely from the end of the discharge pipe, turn the power to the water heater OFF. Call a qualified person to determine the cause.
At least every five years, have a qualified person inspect the T&P Relief Valve and discharge pipe. Damage caused by corrosive water conditions, mineral deposits, or other problems can only be determined when a qualified person removes and inspects the valve and its components.
Note that a dripping T&P Relief Valve is usually caused by the home’s water pressure being too high or the lack of a Thermal Expansion Tank. If your T&P Relief Valve drips, see page 24 in the Installation Instructions.